
These instructions are specific to our internal presenters.
-
- Meet with your Zoom Host in advance to:
- Set up polling questions or breakout rooms
- Test your presentation before the session date
- Review check list (see at bottom of page) to finesse timing and flow of presentation.
-
Starting Zoom and Zoom Meeting Controls available to Presenters
-
Remote Control (passing control to another presenter, if applicable.)
-
Finishing your session or passing the session to the next presenter
Before You Get Started
- Make sure you are using:
-
- A high-speed internet connection to your computer (a hard line is ideal).
- An external webcam or built-in camera on your computer.
- The built-in microphone on your computer will work, or for better sound, an external USB microphone or a headset can be used.
- Although Zoom can be downloaded on Android and iOS devices, we strongly encourage you to use a laptop or desktop rather than a smartphone or tablet. This will give you a better facilitation experience with more functionality.
Starting Zoom and Zoom Meeting Controls available to Presenters
- As a presenter, you will have received an email from the host several days prior to your session providing you with a link and phone numbers to join the meeting. Click on that link to join the meeting at least 25 minutes prior to the session start time.
- When asked whether to join via your computer or dial in, please choose dial in. One of our most consistent barriers with Zoom is audio. (Calling in using your smart phone or landline virtually eliminates any such issue.) Be sure to MUTE your computer audio or your voice will echo!
- Once you are connected, turn your attention to the screen to familiarize yourself with the available controls. They will be located at the bottom of your screen.
The following are the controls available to a presenter during a meeting. They will be located at the bottom or top of your screen in a bar that looks like this:![]()
-
- Audio: Mute and unmute your own microphone.
- Video: Start and stop your video camera.
- Participants: Clicking here will show you all the names of each attendee in the meeting, along with controls that allow participants to raise and lower a virtual hand.
- Chat: Here you have the ability to send a message to Everyone or a Private message to a single individual.
- Share Screen: Clicking here will give you options for selecting the application or screen you wish to share.
- Record: [only visible to meeting hosts and co-hosts]
- Reactions are only available when your camera is turned on. You can choose from thumbs up or clapping hands emojis, which appear briefly in your camera window after you’ve made your selection.
How to change the view:
-
- Gallery View and Speaker View: Found in the top right corner of the screen once you’ve joined the meeting and at least one camera is turned on. Speaker View will display only the window of the person speaking. Gallery View will show all windows of all participants in a faces-in-windows format.
- Be sure your presentation is open and ready to be shared before you begin screen share. Nothing else should be open on your computer other than what is necessary for your presentation . Click on ‘Share Screen’ and bring your presentation to full screen.

-
- There are three methods you can use to screen share a PowerPoint presentation in a Zoom meeting:
- Dual monitors: you can share a slide show while viewing presenter’s notes in another monitor.
- Single monitor: you can also start the slide show in a window so you have access to other meeting features while sharing your presentation.
- Single monitor with slideshow in full screen.
Click here for Zoom’s helpful guide.
- There are three methods you can use to screen share a PowerPoint presentation in a Zoom meeting:
-
Requesting or Giving Remote Control of Your Screen
It is possible to share control of your screen with another presenter. This is useful when more than one speaker is presenting a co-authored presentation.
- When the first speaker is ready to give control to the second speaker, click ‘Remote Control’ and choose the participant to whom you are giving control. In the example below, Presenter One is listed. Please be patient, there is a brief delay before you can take control.

- To return control, click ‘View Options’ at the top of your screen and choose ‘Stop Remote Control’. Alternatively, the first presenter can also retrieve control by clicking ‘Remote Control’ and then choosing ‘Abort Control’.
Share Screen with Embedded Videos
If you have audio/video in your presentation, click Share computer sound at the bottom left of your screen before you click Share. It is highly recommended that you practice playing your video using the link sent to you by OCPD prior to the meeting. Have another person (Heather Mason) join you and ask for their feedback on their viewing experience. *Of note, sharing videos does not always work well in Zoom.
![]()
If the video play back is choppy, try the following these steps:
- Just before you play your video, click on More at the right side of your black meeting control bar and make sure ‘Share Computer Sound’ is checked. Select ‘Optimize Screen Share for Video Clip’.
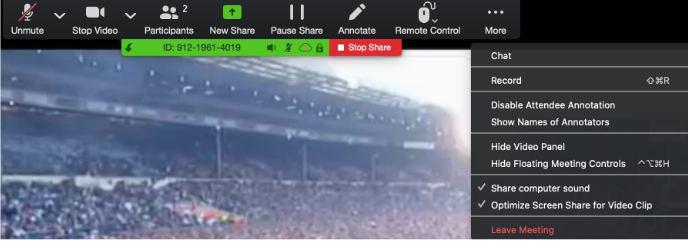
- Go back to ‘More’ and select ‘Hide Floating Meeting Controls’. This will prevent the viewer from seeing a black box overlaid on your video (the meeting control bar). Play your video.
- When your video is finished playing press ‘Esc’ to return your meeting control bar to the screen. Click ‘More’ and uncheck ‘Optimize Screen Share for Video Clip’. This is important for the viewing quality of the remainder of your presentation.
Share Screen Using an External Link
- When you get to the slide that has an external link, do not click on the link. Instead, make sure you have separately opened the link beforehand, click on New Share in your meeting control bar at the top of the screen. If it’s hiding, click Esc. Choose the window with your opened link and click ‘Share’. When you’re finished, click ‘New Share’ and select the presentation application window, bring to full screen, and continue with your presentation.

When finished with your presentation and taking any questions, click the red ‘Stop Share’ button in your meeting control bar. This will allow the next presenter (if there is one) to share their screen, as this meeting is configured to allow only one participant to share their screen at a time. If there is no other presenter after you, you can leave your last slide up during your question and answer segment or stop sharing to have a large view of participants.
Meet with your Host prior to your session date!
I am happy to trouble shoot and assure that all goes well!
We want your session to be as smooth and professional as possible, so it is vitally important to set aside a half hour to test your presentation with your host and the equipment you will use during your session before the date of your session. Please contact Heather Mason to schedule time.
Things you will go over in your practice session:
- Setting up polling questions for participants? This must be done prior to the session and during the session the host will start, show results, and close the poll when you arrive at that slide
- Setting up breakout rooms for participants? Discuss with host to coordinate what will work best for your session.
- Your preference on how to respond to questions during or after your session.
- Testing any videos or links embedded in your presentation.
- Testing screen sharing to ensure the screen comes up on the correct monitor.
- Go over what the host is doing in the background while you are presenting (muting, closing unnecessary video for participants if the session starts to receive interference, etc.)
Please contact Heather Mason to set up a time to go over your needs for a successful session at hrmason@carilionclinic.org or 540-855-6861.